The inverted L antenna has been around for many years, as long as there has been radios to use it. It is a good antenna for both transmitting and short wave listening and easy to put up. Radio Shack has a kit that will allow you put up a 70-ft inverted L complete with a 50-ft. single wire feedline, insulators and a window feed through. This antenna is listed in their catalog as 278-758 and doesn’t cost much. It is also a good transmitting antenna, as long as you keep the power to less than 200 watts or so. As a point of interest, Figure 1 is a current diagram of what the antenna current distribution would be on 7 MHz, if the antenna were only a total of 70 ft. long, including feedline.
The Inverted L Antenna - Figure 1
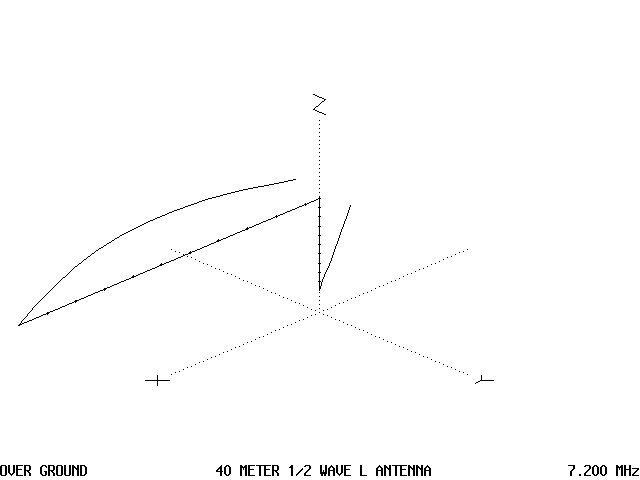
For this discussion, the antenna is going to be 30 ft. tall, starting 3 ft. above ground, which is windowsill height and then going horizontally 40 ft. Also, the many surrounding power lines and telephone cables and other such items were not figured into the patterns. These external conductors will have an influence on your antenna installation as far as pattern shape and orientation is concerned. However, in general since there is not very much that we can do about such things, the best idea is to not worry about it.
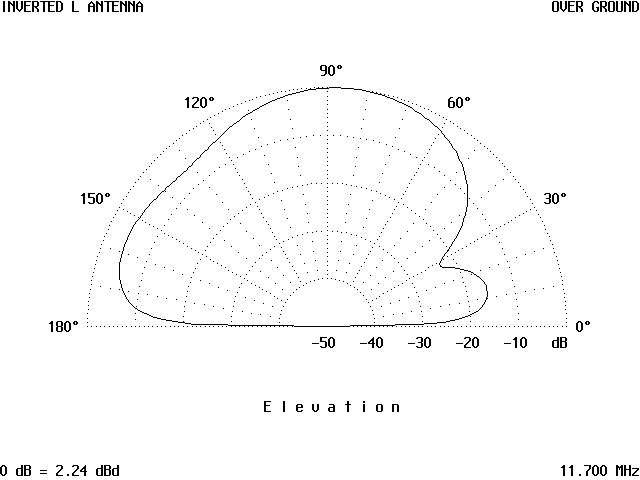
Continuing on through the short wave spectrum, Figure 2 is the vertical radiation pattern of the same antenna on 3.3 MHz.
The Inverted L Antenna - Figure 2
The so-called tropical band, Figure 3 is the horizontal pattern and it shows that the antenna is pretty much an omni-directional antenna, with a very slight amount of directivity along the axis of the antenna. In other words, in the way the horizontal wire is aimed.
The Inverted L Antenna - Figure 3
The vertical pattern in Figure 2 (Above) shows the antenna on this frequency is a good high-angle antenna, with the majority of its reception being primarily high-angle, short-skip signals in this frequency range. It does not mean you will not be able to hear any DX, just that the majority of the signals will be from within several thousand miles radius. Things like power lines can either aid or hinder your reception. This frequency range is usually very noisy during the spring and summer months anyhow with very high static levels and lighting crashes from tropical storms many miles away during the summer making reception difficult at times.
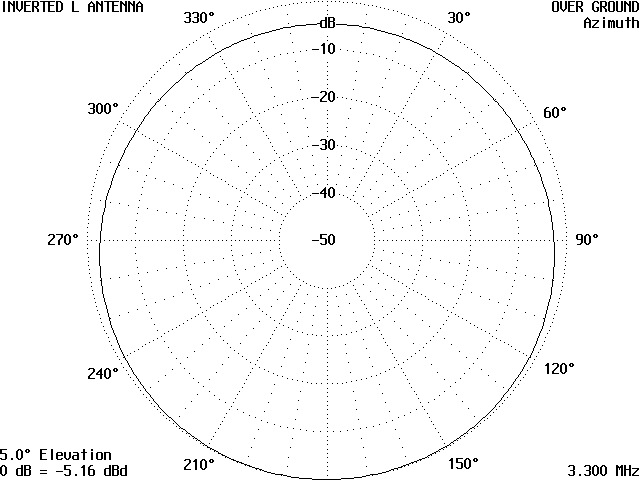
Figure 4 is the vertical radiation pattern for a frequency of 11.7 MHz and shows the angle of radiation has not decreased very much, but will be useful for DX reception. The major lobe is still rather high with a smaller lobe at a much lower angle
The Inverted L Antenna - Figure 4
Figure 5 shows the antenna construction without any current distribution lines on it and this makes it easy to see why it is called the inverted L antenna.
The Inverted L Antenna - Figure 5
Figure 6 is the 11.7 MHz horizontal pattern and it still is basically omni-directional for all intents and purposes.
The Inverted L Antenna - Figure 6
The vertical pattern in Figure 7 shows that there is a lowering of the vertical angle of maximum received or transmitted signal and is also non-symmetrical. Along the 0-degree baseline the angle has lowered to about 50 degrees and along the 180-degree line, it is a narrower lobe, but still at the 50-degree angle. Figure 7 and Figure 8 are both for the 15 MHz range and shows the antenna still maintains a basically omni-directional pattern. The vertical pattern shows a slightly more directional line along the axis of the antenna. The major vertical lobe still has a 50-degree radiation angle, with a notch at the 90-degree angle and a smaller lobe at the 10-degree mark.
The Inverted L Antenna - Figure 7
The Inverted L Antenna - Figure 8
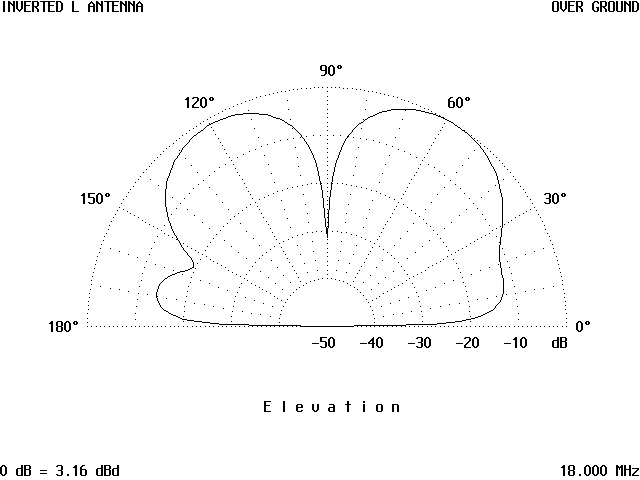
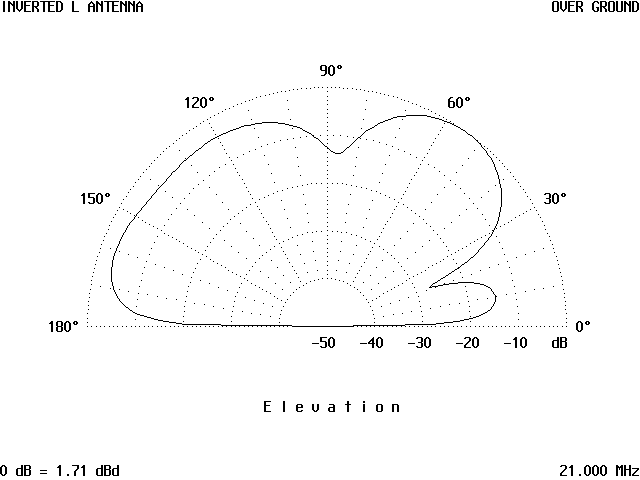
Moving up the spectrum to the 18 MHz band, Figure 9 shows the angle of radiation has lowered in both lobes, but the major lobe at 0-degree is still wider than the smaller minor lobe along the 180-degree line. As far as the horizontal pattern is concerned, it is still much like the one at 15 MHz. Going up to the 21 MHz band, the horizontal pattern is still pretty much the same as the 18 MHz band and is not shown.
The Inverted L Antenna - Figure 9
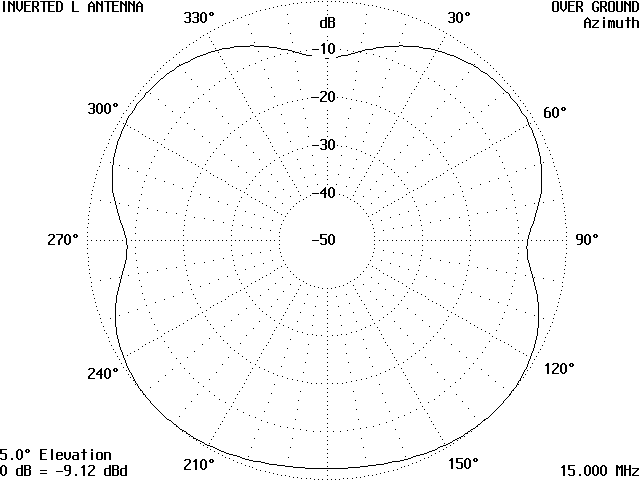
Figure 10 is the 15 MHz vertical pattern and it has changed somewhat from the 18 MHz band, and will show slight but noticeable improvement.
The Inverted L Antenna - Figure 10
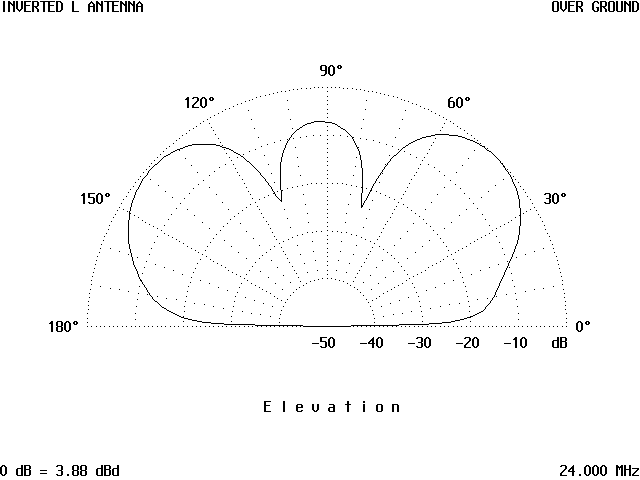
Figure 11 is of the 24 MHz band and again this is similar to the other previous bands.
The Inverted L Antenna - Figure 11
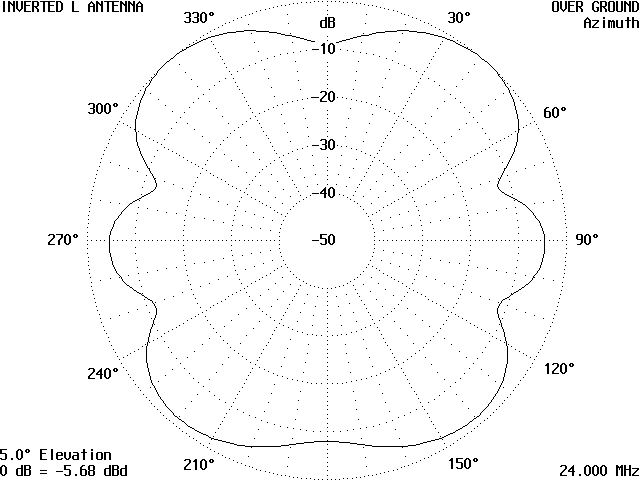
For an interesting comparison, Figure 12 is a horizontal pattern of this antenna on 1.8 MHz, the 160 meter band and comparing it to the 24 MHz antenna gives a good comparison as how an antenna used on many frequencies will change pattern shape.
The Inverted L Antenna - Figure 12
For an even more interesting comparison, compare Figure 13 and Figure 14, the 24 MHz pattern and the 1.8 MHz pattern.
The Inverted L Antenna - Figure 13
The Inverted L Antenna - Figure 14
The last band of interest is the 28 MHz ham band. Figure 15 is the current distribution of the antenna on this band.
The Inverted L Antenna - Figure 15
Compare it with Figure 1, which is the current distribution for the 7 MHz band. You can see the 28 MHz band shows a nearly 2 wavelength current distribution along the horizontal portion of the antenna, and 1 1/4 wavelength along the vertical portion. The 7 MHz current distribution is longer than 1/2 wavelength and the current distribution shows this. The horizontal patterns for some of the higher frequency ranges were not shown, as they didn’t change that much as the frequency increased.
The Inverted L Antenna - Figure 1
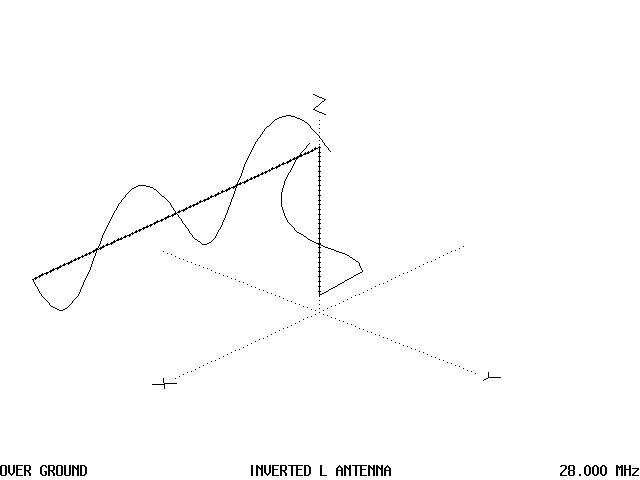
The last Figure is a 3-D representation of a patterns are for 28 MHz as shown in Figure 16. As with any antenna, this antenna should be as high as you can get it and in the clear as much as possible. The variations in pattern that occurs as the frequency is increased will cause the antenna to favor different directions as you tune upwards in frequency and makes for interesting listening. Again, keep in mind what you have for an antenna will not produce the same patterns as this example, but you will get good results in nearly all cases with this antenna. There are some interesting variations that can be made using this antenna as a basic starting point. Keep in mind, all patterns shown are for antennas in the clear with no other conductors, such as power lines near them.
The Inverted L Antenna - Figure 16
The last point to be made is you will need some sort of matching network for the best results, particularly if you intend to use it as a transmitting antenna. The input impedance varies so widely that an antenna-matching network is going to be required for the best results from this type antenna.
For those who are interested, the patterns were made using AO6.5 which is By Brian Beezley, K6STI. Also all of the patterns for the short wave bands will be close to what the nearby ham bands would be and therefore were not done.
Inverted L Antenna - A Little Bit Later...
160 Through 10 Meters With 28 Meters of Wire!
As with many hams in the world, my space for antenna installation is very limited with just 20 meters (65 feet) horizontally and 8 meters (26 feet) vertically. Despite these restrictions, the urgency to work all HF bands with reasonable performance has motivated the search for a good antenna compromise where efficiency, low cost, simple grounding and simplicity were the main objectives.
While waiting to experiment with the promising CFA, I ended up building an Inverted L Antenna. Its advantages are:
low cost
reasonable DX capabilities
multiband with no traps
high efficiency
can be raised and pulled down in half an hour
Minimum Grounding
The major literature on inverted L antennas always specifies a requirement for an excellent ground system. This particular antenna demands a very minimum ground.
The key in obtaining efficient multi-band operation with a poor ground system is to cut the wire at a length, which never falls on a 1/4 or a multiple of 1/4 wavelength of the covered bands.
In fact, anytime a wire is 1/4 or a multiple of 1/4 wavelengths, it exhibits either a very low or very high impedance depending if its length is an odd or even multiples of 1/4 wavelength.
By avoiding such lengths, its impedance will always greater than 50 ohms and lower than 7-800 ohms. This means a poor ground system with, let’s say 60-ohm resistance, will still ensure a good efficiency.
Editor’s Note: The actual impedance for this antenna varies from 2.98-j321 ohms at 160 meters to 162-j213 ohms on 10 meters. This was calculated over an excellent ground soil such as found in my area using #12 wire. If the height and other dimensions remain constant, then surrounding metallic objects will also cause the impedance on all bands to change depending on proximity to the antenna. It should also be noted that a change in any of the parameters mentioned above would cause a corresponding change in impedance as well as performance. Ground conductivity changes will also cause impedance changes.
My antenna has been cut at 28 meters (92 feet). The length is not the reference since it may vary depending on wire size and insulation. From my experience, any time you install the very same antenna in a different environment you will get quite different results and some adjustments are always necessary. This is why the reference for the wire is its resonant frequency rather than its length. It presents its minimum impedance at 2.479 MHz or, said differently, exhibits a 1/4-wave resonance at such frequency. Its multiple 1/4-wavelength frequencies are therefore:
1/2 = 4.86 MHz
3/4 = 7.15 MHz
1 = 9.33 MHz
5/4 = 11.43 MHz
6/4 = 13.44 MHz
7/4 = 15.37 MHz
8/4 = 17.21 MHz
9/4 = 18.98 MHz
etc.
With few exceptions, like the 7 MHz band, that length satisfies the principle. Even in the 7 MHz band, despite the fact that the length is 3/4 wavelengths, its impedance is above 100 ohm because of the high number of multiples of 1/4 wavelengths.
Under these conditions a simple ground rod without any radials is sufficient to ensure a good efficiency. Obviously the addition of some radial can only improve the antenna efficiency.
Editor’s Note: Unless the ground system was rather extensive such as one of 20 or more wires, the improvement would be marginal and actually on some frequencies hurt the performance of the antenna. So for most cases, no radials would be preferred. Particularly if the space for radials is limited.
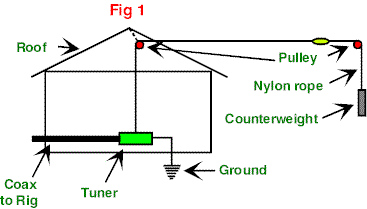
Inverted L Antenna - Figure 1
Figure 1 shows how I mounted my antenna: it is hung at the roof top (8 meters high, 26 feet) and then outward to a tree 20 meters away (66 feet).
The simplest method to measure the ¼ wavelength of the wire is to use a GDO or, as I did, the little Autek RF1 antenna analyzer. The MFJ-259 is just as good. In any case, the measurement has to start from the lowest possible frequency and to spot the first dip while increasing the frequency. That’s the ¼ wavelength resonant frequency.
Wire Adjustments
If the frequency is too low, reduce the length of the wire by cutting 5 cm (2″) at a time. So you should start with a wire 1 meter (3’) longer than with a wire that is too short. The use of an antenna analyzer allows the approximation of the ground efficiency by reading the actual impedance value at 2.479 MHz. If the reading is greater than 80 ohm, I suggest you add some radials and measure the impedance improvement. At impedance values lower than 80 ohm you are okay.
Editor’s Note:Instead of cutting off the end of the antenna, it is a good idea to just pull the required amount that you wish to cut off through the end insulator and wrap it around the antenna. This will allow you to lengthen the antenna if you ever want to lower the frequency for some reason.
The additional advantage of high, but not too high impedance, is that a very simple and very low loss tuner can make the wire to radiate on all HF bands. I initially used the MFJ-16010, a little, low cost tuner for long wires. At that time I ran the antenna through the window of the shack and I am used just the AC main’s ground connection.
Editors Note: NEVER USE THE POWER COMPANY GROUND CONNECTION FOR YOUR HAM SHACK GROUND! The reason for this is that if anything ever happens to the power system ground, your gear and you can go up in flames as all of your gear becomes part of the ground path for every electrical device in your house. It has happened to more than a few unfortunate hams.
Inverted L Antenna - Figure 2
The presence of RF inside the shack on some bands pushed me to build the present setup with a roller inductor and a variable capacitor driven by two small DC motors and installed outside very close that I can control from inside the shack. Figure 2 shows the schematic.
The switch on the variable capacitor is, in practically all bands, set on position “b” to adapt the 50-ohm line to the high impedance of the antenna. It happens, however, that the 160-meter band can also be tuned efficiently with the switch in position “a.” Yes-fellow hams, my antenna works very well on 160m despite its very small size!
The roller inductor can have only 10 uH if the lowest band is the 40-meter band and the wire can be cut in half to be 1/4 wavelength on 4.86 MHz.
I have been able to achieve a 1:1 SWR on all bands but the 10 meter band where the long wires inside the tuner introduce an excessive stray inductance. I will in the future re-wire the tuner to make it work at 28 MHz too.
The signal reports I get regularly with this antenna are normally 5 dB better or more than any reports I get using a 1/2-wavelength dipole at approximately the same height.
Editor’s Note: This particular antenna had very high angle radiation angles on nearly all of the amateur bands below 20 meters, and on the higher frequencies, the amount of high angle radiation was significant. This is not a reason not to use this type of antenna, particularly if you have room for nothing else. His use of the remote tuner is a very good, as it puts the antenna tuner at the antenna where it should be. This will allow the radiation of energy from the coupler, however much that may or not be, be to be added to the signal from the antenna.
I tried to simulate this antenna with AO of Brian Beezely and ENDFEED of R.J. Edwards, G4GQ but despite my efforts, I never got the impedance results that the actual antenna exhibits. Just recently I purchased the MFJ-259B with which I expected to get more accurate readings than the old MFJ-259 or the Autek RF-1. The reading were still the same.
Originally posted on the AntennaX Online Magazine by Anselmo, HB9ICK