Home Brew Folding Mast
NOTE! This Project Involves Large and Heavy Materials, Use Caution. Do Not Try to Lift Heavy Masts and Other Components Without Help.
The problem of finding a suitable support for an antenna is one that faces a lot of amateurs. In many places, the trees are not tall enough or are not there, as in some parts of the desert regions. The coastal plains of South Texas is a case in point, as the local mesquite trees seldom get more that 20 feet or so tall and they are never where the antenna needs to be. The few species of trees that are tall enough to be used to hold up one or both ends of a wire antenna very seldom are considerate enough to plant themselves near the hamshack, and if they do, there are no branches close to the ground making climbing easy. Trees just don’t seem to have any interest in helping a ham get his antenna up, so don’t expect any co-operation there.
So the next best thing is to make a folding mast capable of holding up a vhf/uhf antenna, or one end of a dipole or other wire antenna. Ha, you say? Who has that kind of money or welding skills? Not me! So make it out of wood. Wood is easy to work with and can do the job as well as metal. It just needs weather proofing and reasonable care after it is installed as your mast. Now we are not talking about holding stacked 4 element 40 meter beams, but antennas that are not of such heroic proportions.
To start with, decide how tall you want the mast to be. Keep in mind this thing can get heavy fast, so a duplicate of the Eiffel Tower would possibly not be feasible, and not appropriate for Yukon, Oklahoma or anywhere outside of Paris. Besides, the neighbors would talk. So call the local lumberyards and find out what the maximum lengths for 2×4 white pine or the wood of your choice and redwood 4×4. The redwood is for the mast support and one end is buried, of course, so a wood resistant to moisture and rotting is desired. Short creosote poles could be used, but the creosote is not a good thing to get on your skin in the summer as it burns something fierce.
You could make the support masts out of 2×4 pine boards in the same manner that the mast is constructed, but redwood is a good choice. The decision is up to you and will depend on what is available and your finances. Just get the best materials that you can afford.
Diagram A shows how the mast is constructed. But before you start bolting things together, give the wood a very, very through coating of some sort of wood preservative and water proofing. After you finish drilling all the required holes, hit the holes with more water proofing compound because what you do now will determining how long this mast will last. Painting the mast with a color that blends in with the surroundings will allow you to maintain a low profile.
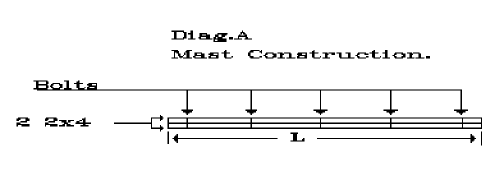
After the waterproofing compound has dried and the mast wood is ready to put together, start by laying the boards side by side as in the diagram. Then clamp them together with large C clamps. This will give you a 4×4, if you didn’t buy one to start. If you did, skip this section. If you didn’t, read on.
The next thing is to drill pilot holes about every 2 or 3 feet along the length of the mast. Now take time to go to the hardware and buy enough 3 3/4″x3/8″ diameter countersunk wood screws to do the job. If you don’t have a screwdriver attachment for your electric drill, get one. Doing this by hand is guaranteed to cause world class blisters on your paws. Also, stop some where and get a cheap bar of soap, old Indian trick to be used requires soap.
As this project progresses it gets heavy, so get help to move things around. Assuming that you have the drill ready to drive all of the screws, proceed as follows. Take each screw and rub the threads on the soap bar so that there is soap in all of the threads, and then drive the screw into the mast assembly. The soap acts as a lubricant and will not harm the wood, making the job easier. (Old Indian Trick.) If you alternate sides as you sink the screws, the stresses are distributed more evenly through the structure. Lag bolts and washers can be used, but remember they have to clear the mast supports at the bottom of the mast when the mast is raised or lowered.
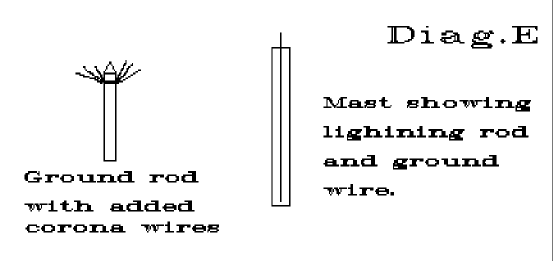
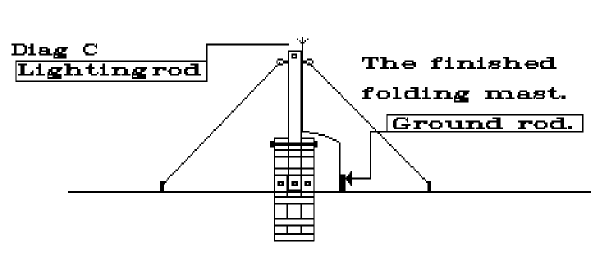
After the mast is screwed together, coat every screw head with paint or whatever you are using for waterproofing. Be sure any hole that is left gets the same treatment. Now you need to mount some of the mast hardware like the pulley hook and the eyebolts for the guy ropes and the lightning rod. Lightning rod?? Yes, lightning rod. Remember that the mast will be sticking up in the air X feet and will grow taller in proportion to the severity of the storm, so some sort of protection is needed. A ground rod with several lengths of #10 wire or larger soldered to it at the pointy end with the wire ends all filed to a point and fanned out will do for the point at the sky end. Clamp the rod to the top of the mast after you have soldered, not clamped, the rest of the #10 or larger wire to it. Then staple the wire down to where the pivot point will be. Don’t cut it off now as there will be more wire run later. Again, waterproof things thoroughly. See Diagram E.
Now look at Diagram B. Lay everything out on a level surface as you can find like the diagram shows. Determine how deep you are going to sink the support masts. A good rule of thumb is to go 1/6 to 1/5 of the total height of the mast. So if you are going to put up a 40-foot mast count on going down between 6 to 8 feet. After you have everything spaced out and laid out properly, clamp the support masts to the mast with pipe clamps. Get out the 3/8″ drill and a bit large enough for the bolt you are going to use for a pivot bolt to go through. Make it long enough to go through all of the wood. Now drill your pivot bolt hole.
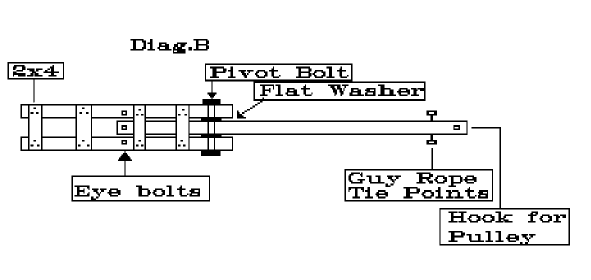
Now at this point you have a choice. You can either drill another hole at a lower point on the mast and support masts to be used for an anchor bolt to lock the mast down. Or you can use eyebolts mounted like in the diagram and run some sort of rod through them so the mast is locked in place. No matter which you use, just be sure that you can secure the mast so nasty vandals cannot drop your mast on someone’s head or car or house.
When you finish drilling all the holes or eyebolt mounting, unclamp the assembly and move everything far enough apart to allow the insertion of flat washers on the pivot bolt between the mast and the support mast. Two washers on each side between the support masts and the mast will act as bearings between the two support masts and the mast, instead of the wood rubbing the paint off of the mast and the support masts.
Be sure to have allowed room for the bottom of the mast to kick out when the mast is lowered and there is no interference with the top sections when they come down. You can put counter weights on the bottom of the mast, an option that is up to you as is the small support mast that holds the top end of the mast off of the ground. The small mast does reduce the angle you have to work against when time to raise the mast comes. Diagram D is your reference for installing the mast assembly. Get help. It is heavy, as if you haven’t found this out by now.
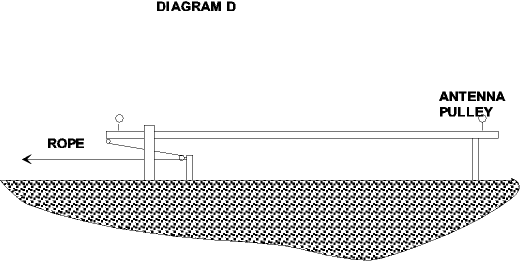
How you get the mast in the ground and up in the air is up to you. There are so many variables depending on where you live that any suggestion made might be totally inappropriate for your location.
One thing to be stressed is the forces required to pull the mast up to the vertical are tremendous and not to be taken lightly. In the process of raising a 40-ft. mast with 7-ft. support masts above ground, a 7 hp. riding lawn mower was used along with a hefty pulley system. A 3/8″ eye bolt was converted to a hook in the process, and would quite possibly have been straightened out if any thing heavier than a dipole center had been mounted on top of the mast. So don’t hesitate to over-engineer it some. It is better to be safe than have the mast fall on your neighbor’s expensive something or other. Or on your own expensive whatever.
Assuming the mast is installed and working correctly as far as going up and down is concerned, now install your ground wire to your ground pipe that your spouse sunk with the water drill to a depth of 30-40 ft. Don’t forget the grounding and the lighting/corona rod (Diagram C), as you don’t want your hard work charcoal broiled. Or your rig!
Originally posted on the AntennaX Online Magazine by Richard Morrow, K5CNF
Last Updated : 12th March 2024

