Installing the Titanex V160 HD 80m / 160m Vertical Monster Antenna
There is nothing better in life than playing with large antennas!
And the bigger the better and they do not get much bigger than the Titanex V160 HD, this antenna is 87.6ft high, and operates on 160, 80 and 40 meters via a crude tuning mechanism, but more on that later.
Nothing about his antenna is on the small side; the actual antenna itself is made up of an Aluminum Titanium Alloy and is very light indeed, to the point that when the antenna is connected together, its entire length of 87ft can be easily dragged around the place with complete ease.
The connection of the tubing is also very simple, the instructions are very basic to say the least, but that said, you cannot really get this part wrong at all, the only issue that I came over was trying to get the holes to match up, but on turning the poles over 180 degrees that got sorted.
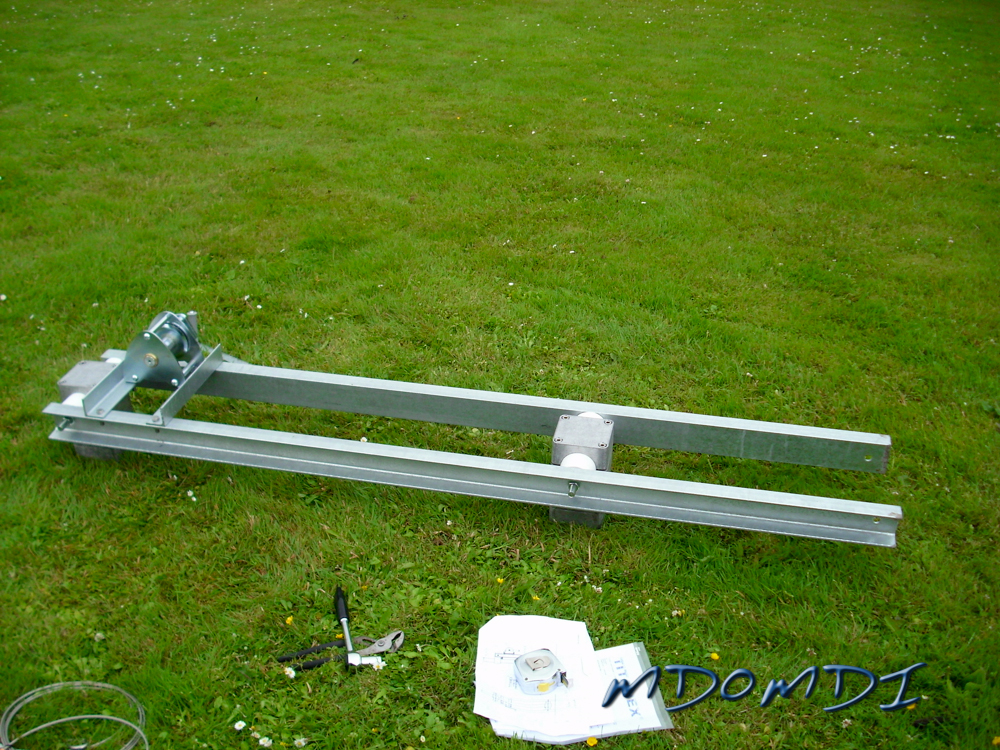
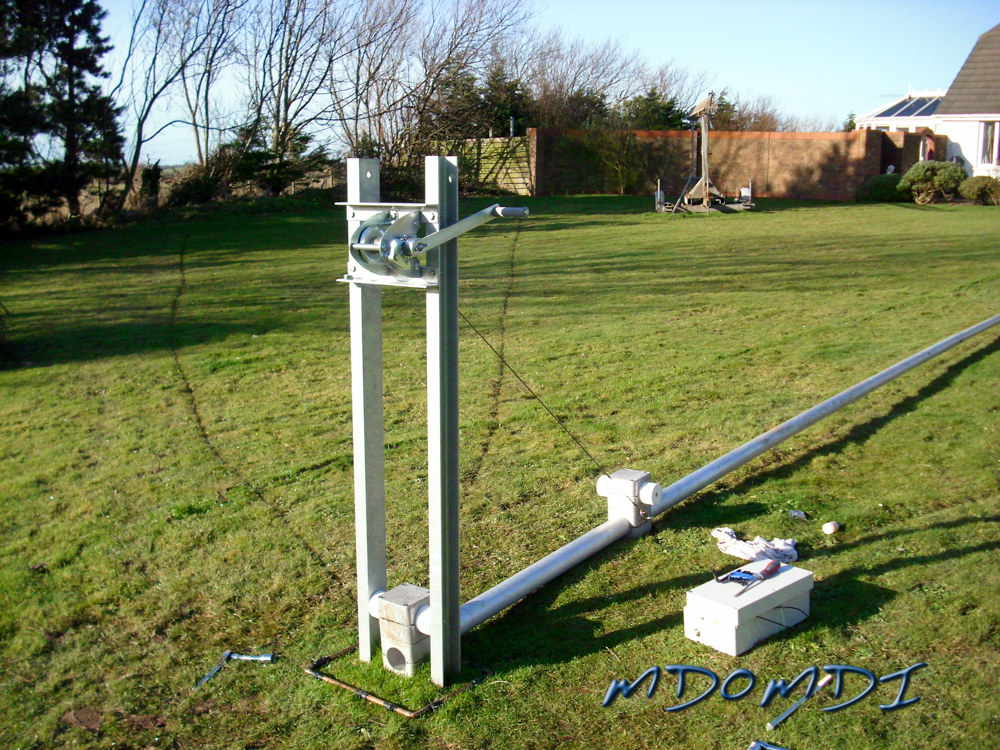
With the antenna itself built, the next part is the supporting base, which is made up of a couple of large U section steels and some very large insulators and some big metal clamps, there is a drawing of the base, but this doesn’t really help too much and some logical thinking is need to get this built, thankfully though there are not a lot of parts and after half an hour of fiddling this was built, the next job was to get it buried in the ground, and being a temporary measure a good sledge and its up.
A bit of concrete would help with this being a much more permanent installation but in this case it is not aimed at being up for more than a few hours at a time, i.e. just for night time operation when top band is open, and then down during the daylight hours and even taken down permanently for the summer when top band is just useless.
Well all this done, there is just one last job to do before the antenna gets bolted on and raised.
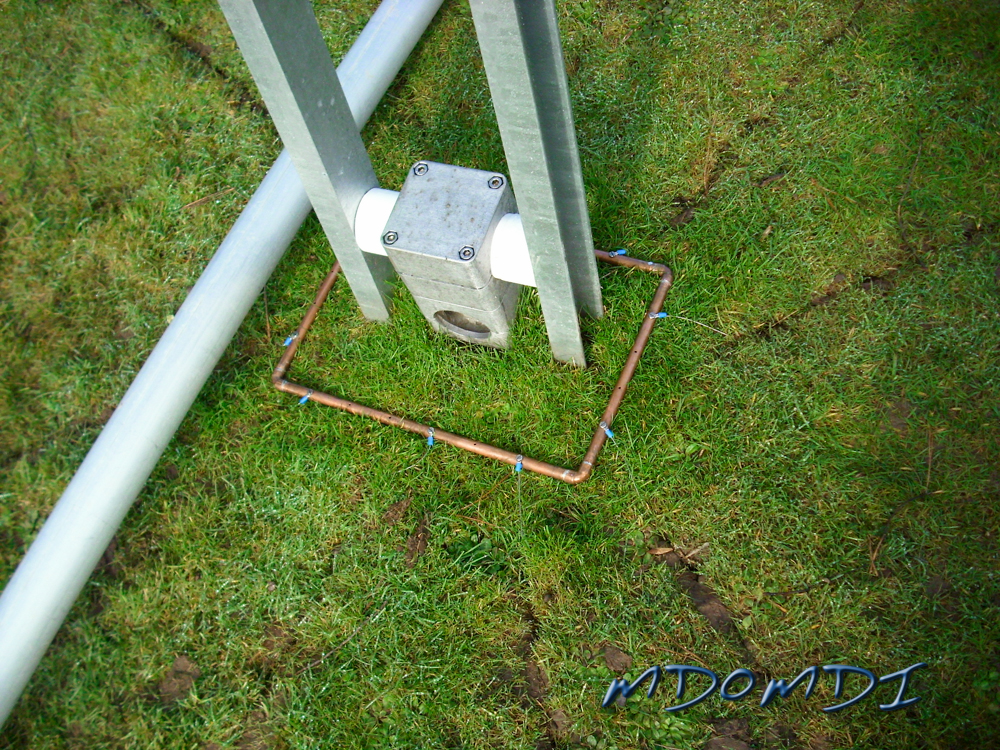
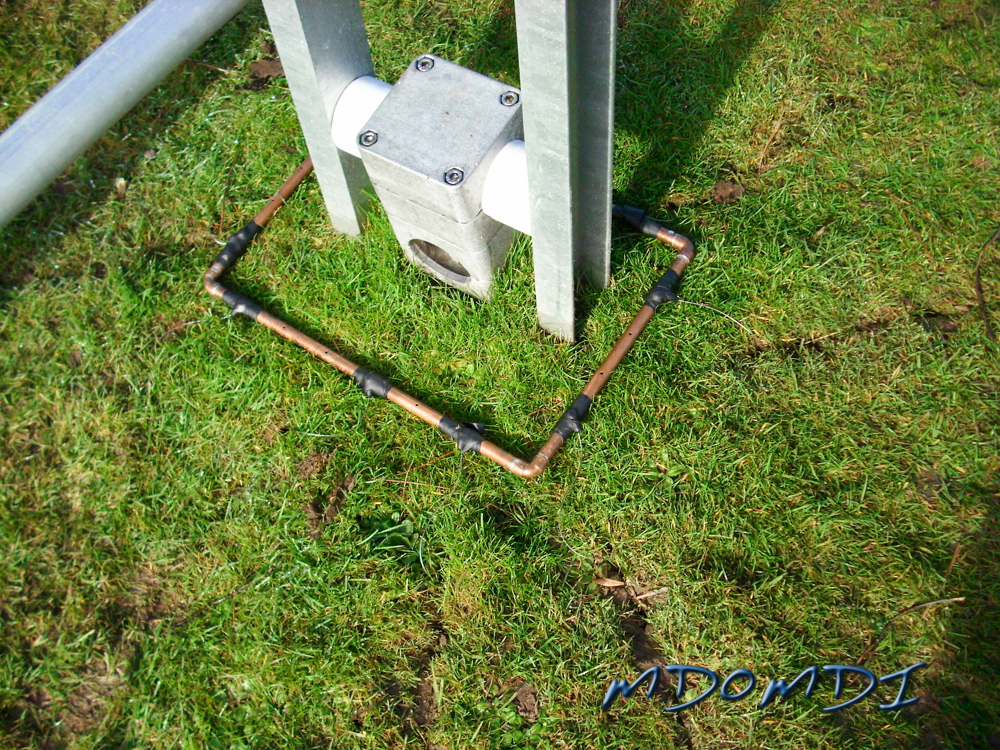
Radials!, now unlike some amateurs out there, it is best to make radials the resonant length of the frequencies that you will be operating on, in this case I wanted 4 large radials of 134’ 5” long for 160 meters and 6 slightly smaller radials of 69’ 4” for 80 meters, these are to be connected to a copper water pipe frame (12″ by 18″ inside measurements to enable it to fit over base with winch attached) that I created which will not only hold the ends of the radials but also be the grounding point for the antenna as well, well obvious really.
As you can see from the above image, the lines radiating out from the copper frame are the radials, these where dug into the ground around 6”, mainly to allow for grass cutting.
One final job which I wanted to do, this is to make sure that the connection to the radials stays a good as possible over time, this is to grease the screws and crimp connections, and finally cover this with amalgamating tape to finally seal the connections from the elements.
Before raising the antenna we needed to look at the tuning box that comes with the antenna, this comes in a large cream coloured waterproof box with some bolts sticking out of the unit, and these are used to apply a small voltage to the relays to switch the tuning circuit between 160, 80 and 40 meters. As well as an SO-239 for the antenna feeder and an earthing point which needs to be connected to the radials.
So all this sounds good!
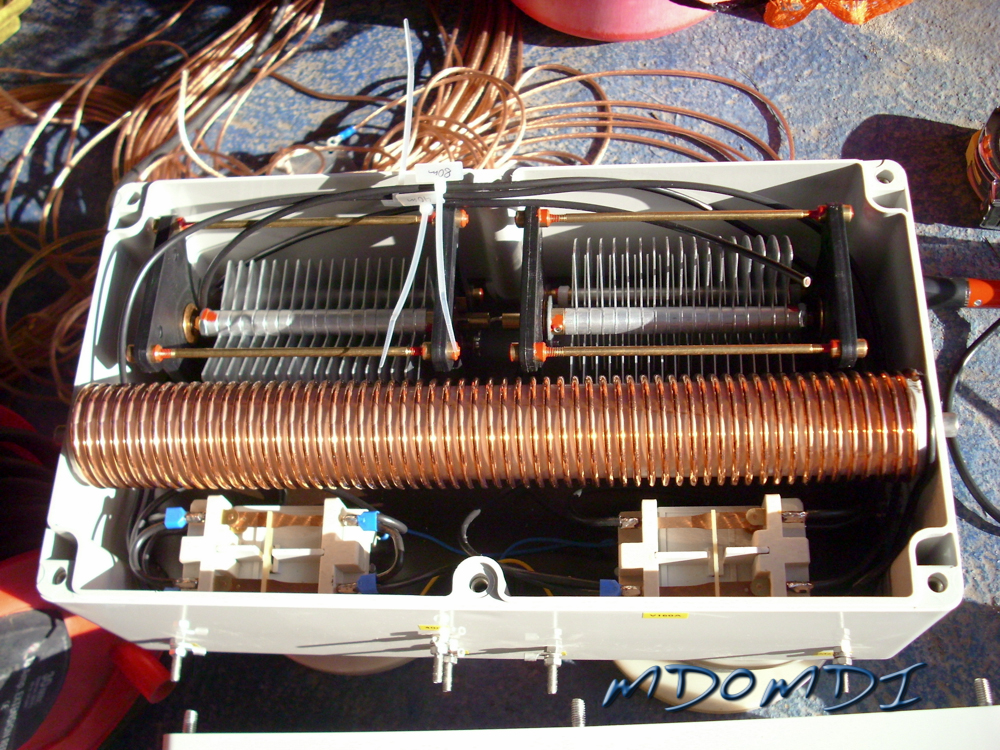
In reality this was a bit disappointing, although the quality seems OK, and the actual quality of the components are very good, this box is a bit of a disappointment, you would of kind of hoped that after paying out for an antenna like this which is fare from cheap, you would expect and maybe hope for some sort of motorised tuning mechanism, but alas no, the 2 large tuning capacitors have to be manually moved to the correct value by pushing the fins into position, and there are also three unattached wires that need to be tapped onto the main coil once you have worked out where they need to be.
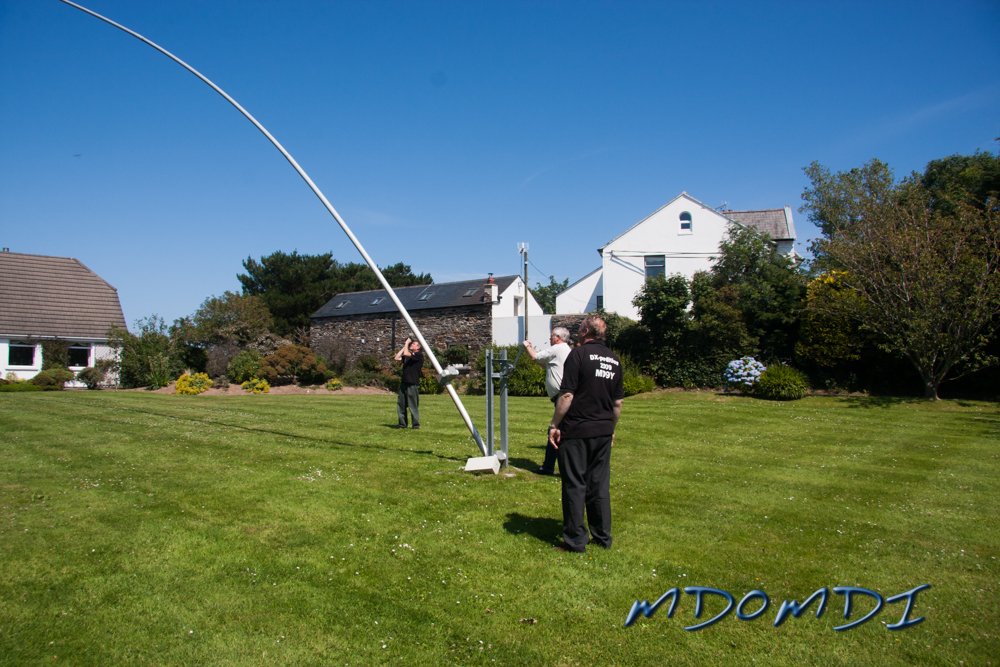
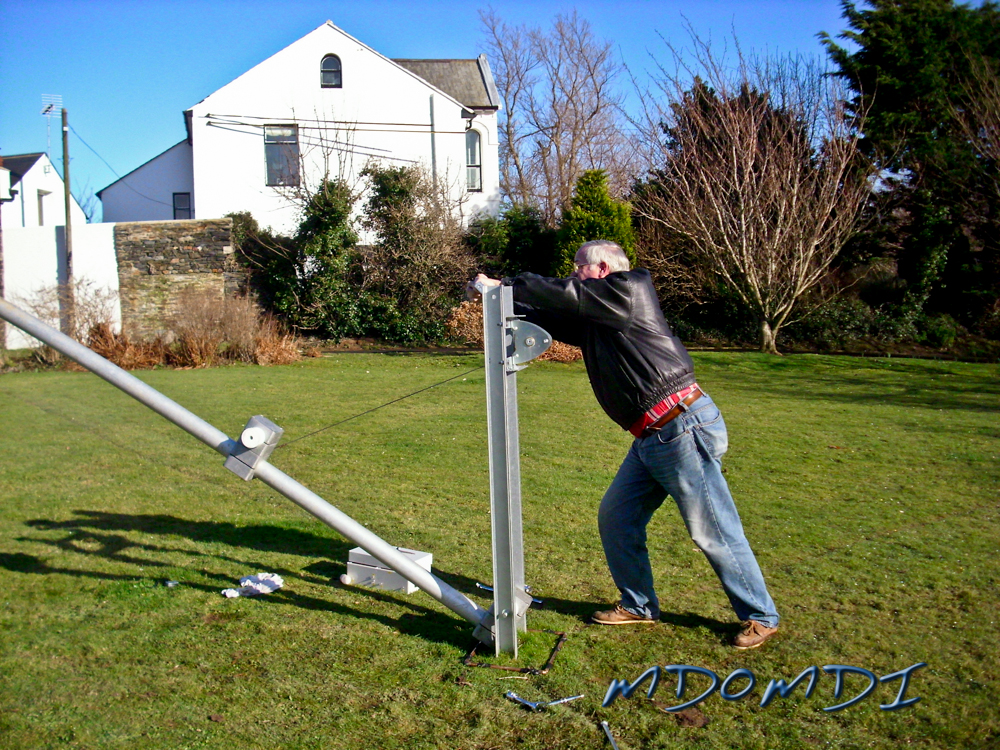
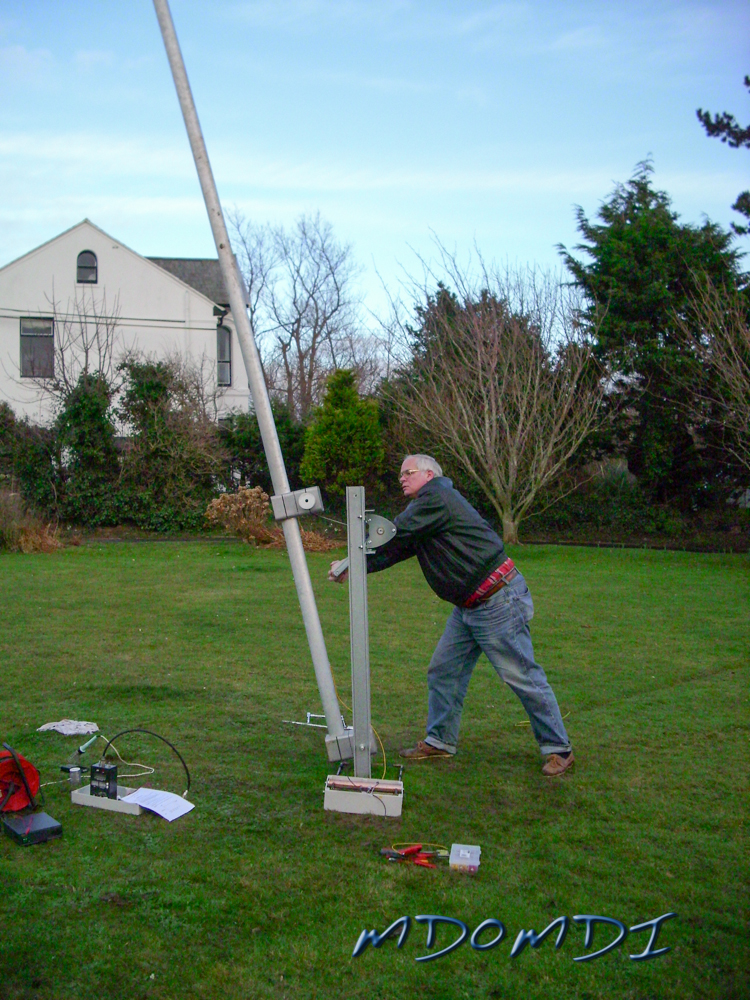
So before we think about fitting the antenna tuning box to the antenna, we need to make sure the beast can be raised, here is a picture of Bob raising the antenna for the first time.
Although this can be achieved quite easily by just one person, it is still a bit on the heavy side, but saying that it only takes a couple of minutes to winch up.
She bends quite well, but being made of a strong Aluminium and Titanium Alloy, she is designed to handle a bit of bending.
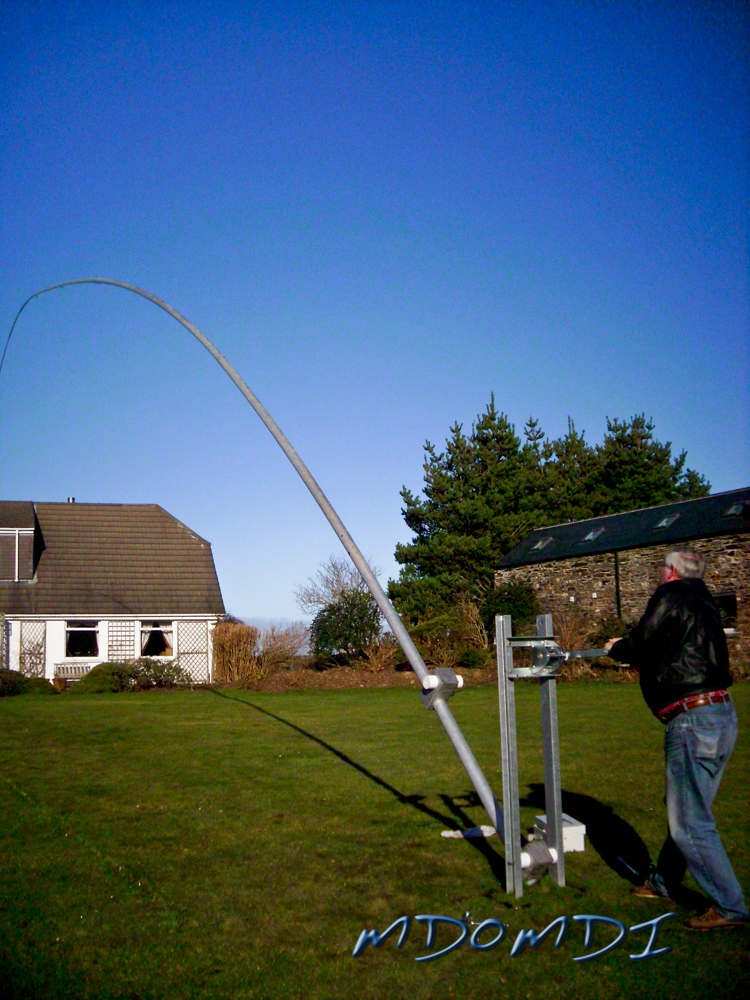
As the antenna gets near vertical she becomes easier to raise and there is a lot less weight on the winch.
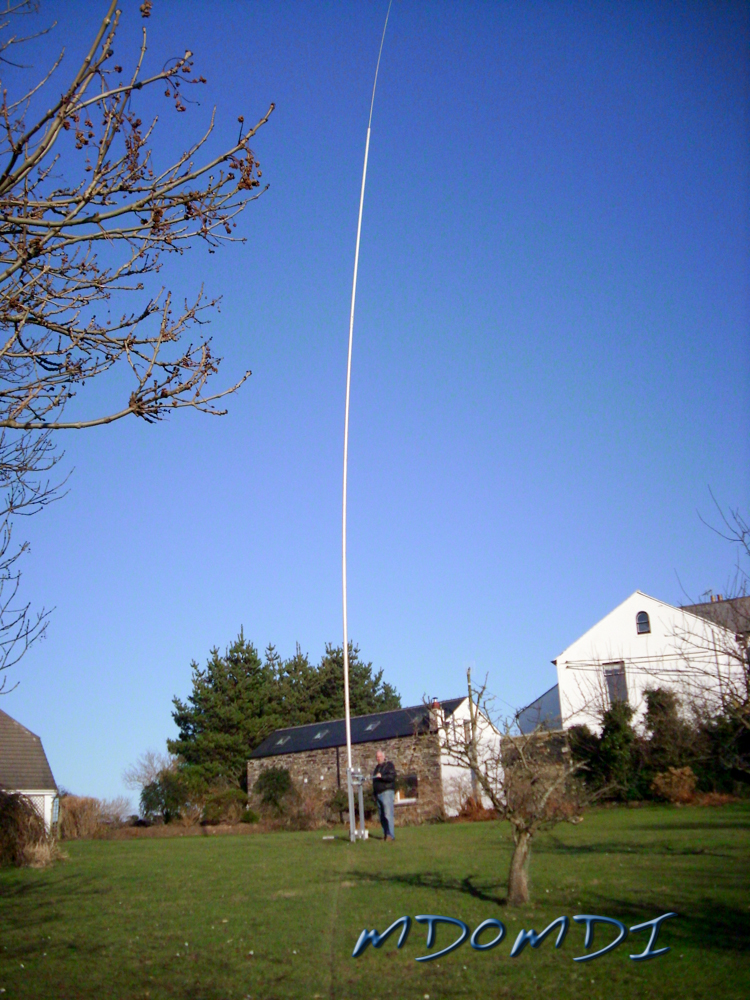
Now with the antenna raised fully and ready for the final assembly of the tuning box, I managed to get a good photo here showing the scale of the antenna, that small ant sized human at eh bottom of that large antenna is Bob MD0CCE, bearing in mind he isn’t small at around 6’ either.
The Titanex V160 HD is one very impressive looking antenna. But will it work as well as it looks?
OK, before we get to the performance side of things, here is another gripe!
First off, you need to make a connection from the tuning box to the Titanex V160 HD antenna, and although being an amateur you are bound to have suitable wire around the shack, Titanex don’t supply anything, well not for this anyway, so you need to measure up and create a small piece of wire, with a crimp and soldered lug on each end of it, this obviously needs to be short enough so as to not hinder the length of the antenna, and not too short as to cause issues when the tuning box it mounted to the antennas base.
A minor gripe at this point is that the last section of the antenna is not pre-drilled or neither does it have a ready-made connection to which to connect the tuning box to the actual antenna, but this is easily cured by drilling a small hole as near to the bottom of the antenna as you can get, bearing in mind the clamps that are holding the antenna in place.
So you have now made up two leads! Well you obviously need one for the antenna connection and also one to like the earth connection on the tuning box to the radial system.
With these in place the only requirement now is to connect 12V to the tuning box via 2 different connections, for this you will need a 3 core cable that is obviously long enough to reach from the shack to the antenna, and in this case at the time of purchase Titanex where asked to send a 150 meter drum of 5 core cable, this was of a very good quality and well up to the task. But we would not be using this yet.
The tuning unit needs to be sorted out first, and to do this we would use a MFJ Antenna Analyzer instead of a Transceiver and a long mains extension lead and a 12V PSU with a couple of jump leads to switch the correct tuning circuit into place.
Here is where we have a problem. With the 160 meter tuning circuit in place and then temporarily holding the 160 meter lead against the coil at the position stated in the documentation that would be a good start, we managed to not get an SWR reading below ‘Off the Scale’, this was a little worrying, we had a slightly better reading from the 80 meter wire and the correct voltage applied to select this tuning circuit, though this was still very high, but we did not spend much time playing around with this as 160 meter is the main and obvious reason to erect this antenna.
With the readings being what they were it was decided to remove the tuning box altogether and make up a pig tail to attach the feeder directly to the antenna, no box at all! This was also worrying though very surprising, it not only gave us an SWR of around 1.4:1, but it managed it from around 1.80 MHz right through to around 2.5 MHz before it started to rise!
Now with the light failing, and time getting on, as with the pig tail already made up, we connected a 1:1 Radioworks Balun and a suitable amount of very high quality coax so as to reach the shack.
Now finally connected up to the Linear, and test was carried out using just 20 Watts, and sure enough the analyser was right 1.4:1, and this never changed even when substantially more power was pushed through this antenna, so only one thing left to do, get on top band and talk with someone.
The report that came back from a reliable source, though local-ish was not too impressive, running on the 160 Wire inverted V dipole we managed to get a signal report of S10 + 20 and with the Titanex V160 HD the reading was just S9, Not good to say the least, but with night time now here we could not play anymore, so the decision was left to lower the antenna and wait till there was more time available and more light to play.
The lowering is basically a two man operation, not because of the weight of the antenna, the basic lowering is handled by the winch, and even though the winches design is pathetic, winching up is not a problem, all very sweet, but to let the winch out you have to hold a kind of dog-link away from the teeth, now I can understand the reasoning behind this, you would not want to lose control of an antenna like this and have it suddenly falling to the ground and crushing someone, but I have seen so many better designed winches, and this is not one.
The dog-link has to be held in exactly a certain position else it will engage with the teeth and lock, the problem is that this is awkward and actually king of difficult to hold at the correct angle whilst you un-wind the cable. The reason for the second person it to grab the end of the antenna before it digs into the ground and snaps off, once the winching is mastered, the lowering of the antenna is only slightly slower that getting it put up.
So what’s left?
The antenna needs guying, and the clamps and Kevlar rope for this is supplied, so that needs to be looked at and got ready for the next attempt.
The obvious hassles of the tuning box needs to be sorted, and this I think will need to be talked through with some other users of this beast, the box seems to be well disliked by the DXpedition crowd, so hopefully we can soon find out where we are going wrong with this. As for the performance, I will try to keep you informed as time goes by, I am sure that this can be also sorted out one way or the other soon enough.