When I decided to enlarge my antenna farm and add some more VHF and UHF antennas, a funny thing happened after I left the local parts place. My antenna farm sort of wilted for want of feedline. Every coax feedline was too costly for my project, considering I needed over 200 feet (61 m). So, I decided to use 300-ohm twinlead. Why? Because the good twinlead has a lot less loss than any coax around. Yes, I know the weather can affect it, and all the other stuff that is supposed to be bad when using twinlead. But it is cheap and replacing it every few years is a lot cheaper than expensive coax and fittings that will also have to be replaced.
I will grant you there are power limitations on the twinlead, but since I was only running 45 watts on 2 meters and 5 on UHF, it was not a problem. However, matching the 300-ohm line to the transmitter can be tricky.
Enter the Coax Balun!
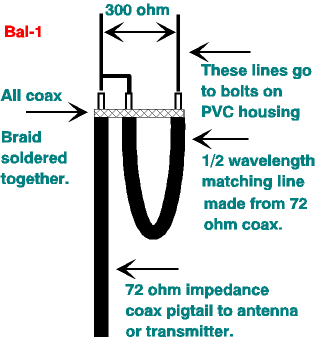
Figure 1 is the diagram of the step up/down Balun. Two of them are needed. The loop of coax and the feedline are both made of RG-59 coax. The loop is found by using the following formula:
Build a Balun - Figure 1
(468/F)*VF,
where VF is the velocity factor of the coax
I found some good grade TV coax that had the foil shield as well as the braided shielding. The foil is peeled off and not used in making the balun. The braid turned out to be steel or some other material that wouldn’t solder. So I had to twist the three braids together as well as I could, then crimp the ends with some heavy copper wire.
Encase with PVC
After completing one of these baluns, a balun case can be made from PVC. You must use at least 1 inch PVC so it will not be necessary to squeeze the coax so much to get it into the pipe. If the coax is compressed into a tight loop, then it is highly possible the center conductor will migrate through the insulation and short out. The PVC has to be long enough to stick the entire loop inside the pipe with some room to spare.
The next step is to put one of the caps on one end and mark how far the cap sits on the pipe. This then enables you to see where to mount the bolts for the external connections to the twinlead.
The bolts and nuts used for this project are brass nuts and bolts with brass washers. You will need two bolts, 2 washers, and two nuts per bolt. After taking off the PVC cap, go down the pipe far enough so the nuts will not interfere with the PVC cap and drill the holes for the bolts. Use long-nose pliers to push the bolts through the PVC. After the bolts are started, push the coax balun up from the other end until you can get the two center conductors where they can be wrapped around the bolts. Put a nut on the end of the bolt and tighten it down fairly tight against the PVC. Do this to the other bolt and coax connection. Then slide the cap on the PVC. DO NOT CEMENT THE CAP–use RTV Silastic. This will allow the cap to be removable in case of any repair needed later.
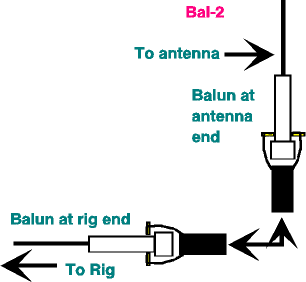
Now, take the other cap and drill a hole in the center of it just big enough to allow the coax pigtail to stick though. Poke the coax through the hole, glue the cap on the end of the PVC with RTV and seal around the coax with the RTV. Install the connector on the pigtail that will match your antenna/rig connection and it is done. Figure 2 shows how they are installed.
Build a Balun - Figure 2
VSWR OKAY
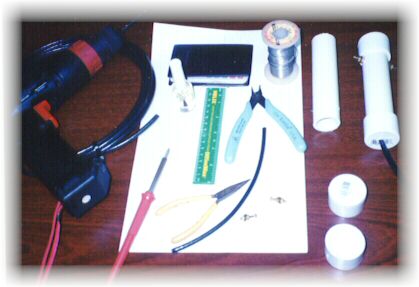
The Photo below shows the equipment and material used to build a pair of 450 MHz baluns. A drill, coax, solder, soldering iron, calculator, ruler, needle-nosed pliers, wire cutters, and PVC pipe and caps. The clear fingernail polish is for sealing the area around the bolt heads inside the PVC. The finished balun is also shown.
Build a Balun - Tool Time
So a balun can be built using the less expensive twinlead instead of expensive coax. In nearly all cases, the difference between the twinlead and expensive coax is minor, as far as signal loss is concerned. If you want to extend the life of the twinlead, just put it inside PVC pipe to protect it from the elements. This is also a good way to use the ladderline type twinlead which also has extremely low loss at UHF and VHF.
Originally posted on the AntennaX Online Magazine by Richard Morrow, K5CNF