Sound Ground
A good ground is not too hard to get in some locations, others it can be very hard to find. Along the Gulf coast and other saltwater coastal areas, a good ground is usually not very hard to find as the water table is not very far below the surface. In locations where the soil is only a thin layer over bedrock, or in desert sand conditions a good ground is not easy to find.
Down through the years there have been many articles on how to get the best ground. All of them state the need for a good deep ground rod, usually several ground rods separated by several feet and tied together with a good soldered or welded weather proof connection. All equipment going to the ground rods is tied together by a prime ground terminal. In other words, everything goes to a common point then that point goes to the ground system through a heavy low loss conductor.
Getting the ground rod into the earth deep enough to do some good has been a source of discussion good for hours of idea swapping. One of the best methods that can enable a lot of ground rod to be buried very deep with minimal effort but a lot of mess is to use copper pipe and make it into a water drill.( Figure 1). By using the water pressure to do nearly all of the work, a fairly long piece of pipe can be pushed into the ground. But you will get wet.
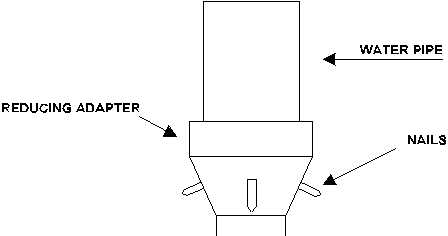
To make a water drill, first determine how far down you want to go with your ground pipe. Then go to a building or plumbing supply store and see how much copper pipe you can afford to buy. Twenty feet of 3/4 pipe isn’t too expensive, but 1/2 will do. If you can get it in 5 ft. lengths it is easier to handle. Also you need to get enough pipe couplings so that you can join the pipe together as you go deeper and last but not least, a reducer from 3/4 to 1/2 or whatever size you need to fit your pipe. The last thing you need is a hose coupling that you can use to connect your garden hose to the pipe.
You will need acid core solder and a torch of sufficient size to solder all of this together and enough heavy gage wire to get from your shack to the ground system when you are finished installing the pipe. A good source of heavy gage wire is a welding supply house, the cable is flexible and easy to work with. Now that you have everything in hand, construction can commence. If you are not too sure of your ability to solder pipe, take time to practice, as a good solid electromechanical connection is essential.
At this time you can do a few things that might make life a little easier on you as you push the pipe into the ground. First, if you want to take the time, get some small short nails or sheet metal screws. Next, drill holes in the reducer around the diameter of the reducer and solder the nails into the holes with points sticking out, or screw the sheet metal screws into the holes. The screws or nails shouldn’t stick out anymore than 1/8-3/16 of an inch past the pipe.
The nails or screws will help to dislodge stubborn objects and cut through the earth, allowing the water to wash whatever it is in the way out of your path to a good ground. This also ensures adequate clearance between the sides of then pipe so that the water can flow up past the pipe and the sides of the borehole easily.
The other thing you can do is to add a fitting to the coupler that you solder the hose connection to so you can inject pressurized air into the water from a small compressor like a lot of people carry in their cars to pump up a low tire. Not a lot of pressure is needed because you don’t want to inject air into your water lines. The air bubbles will help move the dirt out of the way as well as carry the mud up to the surface faster than if the water alone had to do the job. Depending on your particular soil type you might keep these two suggestions in mind. They do make it easier to sink the pipe into the ground.
Assuming that you have everything ready, and have your soldering skills squared away, the first thing to do is to solder the reducer onto a section of pipe, then solder a coupling to the other end. Then drill a hole through the coupling and pipe and put a sheet metal screw or two through both the pipe and coupling. This ensures the mechanical integrity of the connection, since the sections have to endure a lot of pulling, pushing, and twisting as you sink the pipe into the ground and sometimes solder joints will fail. It is no fun to try to retrieve ten feet or so of pipe that is several feet below the surface in a water filled muddy hole that is too small to stick your hand in. In the oil well drilling business, this is known as going fishing and it costs too much to think about.
Next solder and screw another pipe section and coupling. Do this to the rest of your pipe sections so that you have all of the sections of pipe with a coupling soldered and screwed together on one end. DO NOT SOLDER ALL OF THE SECTIONS TOGETHER!! Just put a coupling on one end of each pipe section only. Now you are ready to begin and make a first class mess. Be prepared to get wet and muddy, as it is unavoidable.
Prepare your site by cleaning all weeds, grass etc. away from where your ground pipe is going to be so that you will be able to see what you are doing. Next move anything else away that cannot stand the onslaught of mud and water that will be flying through the air for the first few seconds or minutes. Put on a bathing suit. Take the first section of pipe in hand and hook the garden hose to it. Hold the pipe as close to vertical as you can, with the reducer end about 2-3 inches from the ground and turn the water on, and the air, if you are going to use it.
Now start to push the pipe into the ground. A pair of vice-grips or channel-lock pliers will help you hold onto the pipe. As the pipe starts to sink into the ground, twist it back and forth so the nails or screws will cut the wet ground (mud) and let it be washed away. A lot of water should start to flow up around the sides of the pipe and as you go deeper the color and texture of the mud coming up should change as you cut through the different layers of earth.
When the pipe gets to within a foot or so of the ground, turn off the water, take the hose connector off and solder another section of pipe onto the section in the ground. Don’t forget to put a screw through the pipe and coupler. Hook up the hose connector to the new section of pipe, turn on the water and air again and start drilling. Keep this up until you have gone as deep as you have pipe, or hit something too hard to cut through, or get too tired to continue.
If you should hit something hard after you have gotten down ten to twenty feet or so, try pulling up about three or four inches and letting the water and air wash the dirt around in the bottom of the hole for a few minutes. Whatever it is might be loosened enough to move out of the way, or allow the pipe to slide off at an angle and enable you to keep on drilling. Usually there is enough flex in ten or twenty feet of pipe to allow up to a foot of deviation from vertical so that you can avoid an object. One thing is for sure, you will not be drilling a dry hole.
When you have only one section of pipe left, stop when you get to a good place to do so, and solder your ground wire to this section of pipe, then solder and screw this last section of pipe to what is already in the ground. Then commence to sink the last section to within three of four inches of the surface. By leaving a little of the pipe above ground, there are several things that can be done to enhance the ground conductivity.
The first thing that can be done is the addition of copper sulfate to the ground by pouring it down the pipe and filling the pipe with water and allowing it to seep into the ground at the bottom of the hole. As long as you are below the root level of any plants in the area, and not into any aquifer, you should not cause any problem. Of course you could use rock salt, but be sure that you are below the root level of any tree or other plant that cannot tolerate salt.
The second thing that can be done is to sink another ground pipe several feet away from the first one. As a matter of fact, several shorter ground pipes in a circle around the first deep pipe will contribute a lot to lowering ground conductivity.
If you chose to add several more pipes, all that you will have to do is to buy what you need and start drilling again. Rest assured the more pipe you sink into the ground the better off you will be. Broadcast stations spend several thousand dollars on the ground system for a single tower system, and it pays off. Besides keep in mind, “Where Zeus throws, everything glows”. So keep that uninvited high voltage guest out of the house, ground everything. Also disconnect and unplug everything when you go off the air. Some hams have ac switchboxes that shut everything off with the throwing of one switch, which is good, but one direct hit on the ac mains right outside the house can melt down the switch box and the rig too. So unplug the rig and disconnect the antenna, and ground the coax or whatever that goes to the antenna. “Tis better to be safe than melted.”
Originally posted on the AntennaX Online Magazine by Richard Morrow, K5CNF
Last Updated : 14th March 2024