Phase a Couple of Antennas for more VHF Gain
You’ve most likely seen them on virtually every tractor trailer you meet on the highway, and on more than a few pick-up trucks. Twin Truckers they call them, among other things. And under ideal circumstances they can provide some valuable gain. Unfortunately, a lot of things can negate the gain developed by the pair of phased verticals, such as improper spacing between the antennas, which can result in a condition one ham referred to as a null all the way around.
Pattern Pointing Problem
Even if they work properly, the figure eight pattern it produces points fore and aft, and may not be of much value if the station you wish to contact is on one side of you. A friend of mine found they are not for rural driving, either. Hoping to get a little more boost in his two meter signal while driving to and from work, (located some thirty-five miles from the repeater), he adapted the CB design to a couple of on glass antennas. His delight at being full quieting soon turned to disappointment as he would totally drop out of the machine as he twisted and turned down country roads. It soon proved so unsatisfactory that he went back to a single antenna.
Here’s a Way
A solution to this problem is to devise a system so the directional pattern can be merely changed in order to favor a station or repeater in another direction than straight ahead or directly behind your vehicle. A number of methods in varying degrees of complexity can be used to accomplish the same end, but the method I will describe here is undoubtedly the simplest, cheapest, and will work quite well.
Plainly put, transmitted signals can be fed to two or more antennas so they arrive at the same time (in phase), or out of phase by varying degrees. Providing that the antennas are properly located, the radiated signals can actually be beamed in a desired direction, without physically moving the antenna.
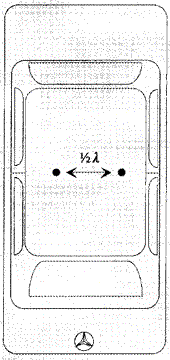
Two vertical antennas, spaced a 1/2 wavelength apart and fed signals that are 180 degrees out of phase, will produce a directional pattern, front and rear, in line with the antennas. Feed the same antennas with an in-phase signal and they are radiated broadside to the two antennas. (This is the theory behind the Twin Truckers mentioned earlier.) Take a look at Figure 1. Different spacing and differing phase relationships can produce different patterns, however this is out of the scope of this particular article.
Here’s one method for mounting the two-phased quarter wave antennas. Spacing has an effect on SWR and it may prove necessary to trim your antenna for an optimum match.
Mount is Important
One of the problems with the CB antennas is that they are customarily mounted on the vehicle’s rear view mirrors. Ignore the potentially poor ground for a moment and you will readily see that a large percentage of the antenna is below the top of the truck. Add a semi-trailer and they are totally blocked. Is there any wonder that such an antenna system is frequently less than desirable? However, I am addressing VHF antennas specifically here, and the shorter physical length is more than offset by the more versatile mounting possibilities.
Placement down on the mirror is out of the question, however, it is no trick to space them a little over a yard apart on the vehicle’s roof, for instance. If making holes in your car doesn’t sound all that appealing, two magnetic mounts will do the job. Perhaps not as well as antennas that are physically mounted to the vehicle, but better than a single antenna. Of course, it is how the antennas are connected that makes the difference.
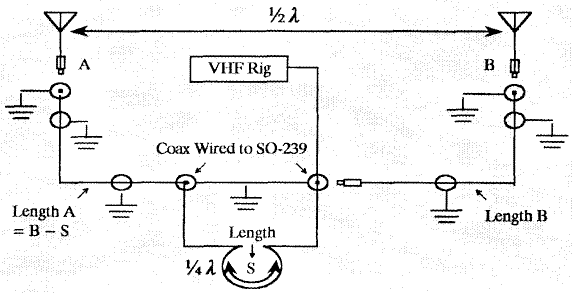
Basically, the only difference in a phased antenna system is that the antennas must be mounted in a specific relationship to each other. All of the work of the actual phasing is done by the coax cable. In this case, however, it must be of a certain length. In duplicating my installation, keep in mind that although the antennas are a physical half wavelength apart, the coax length is measured by its electrical length. (This is the formula length multiplied by the velocity factor of the cable used.)
| Frequency (MHz) | 1/2 Wavelength (1) | 1/4 Wavelength (2) |
|---|---|---|
| 50 | 9.4 ft (2.865 m) | 4.7 ft (1.433 m) |
| 52 | 9.0 ft (2.743 m) | 4.5 ft (1.372 m) |
| 54 | 8.7 ft (2.652 m) | 4.3 ft (1.311 m) |
| 144-148 | 3.2 ft (0.975 m) | 1.6 ft (0.488 m) |
| 223-225 | 2.1 ft (0.640 m) | 1.0 ft (0.305 m) |
(1) Multiply this figure by the velocity factor of the coax cable. Cable to antenna “B” should be a multiple of the resultant figure. The cable to antenna “A” should be the same length, less the 1/4 wavelength figure. The 1/4 wavelength piece connects the two coax connectors together. (2) Actual antenna separation.
The above table gives antenna separation and lengths of coax cables used in the phased array. Use no more cable between your rig and the two antennas than necessary to keep transmission line loss to a minimum. The piece of cable between the rig and phasing selector has no bearing on the directivity and can be any convenient length.
In my own installation, I designed the system for two meters, however the same principals apply to other bands. 220 MHz lends itself nicely to this procedure, as does six meters—if you have enough space on your rooftop. A 70 cm installation will work effectively, in some cases, but be careful to use no more cable than necessary or you eat up your gain in feedline loss.
Phase Switching
The mechanism by which the phasing of the antennas is switched is simplicity itself; it is nothing more than a couple of coax plugs and connectors and a section of coax. By moving a coaxial connector from one plug to the other, different lengths of cable are selected which will set the directional pattern. I did not use a coax switch because I didn’t have one with acceptable loss characteristics at VHF frequencies. If you have one, so much the better.
Coax Cuts
Table 1 includes a list of antenna spacing and coax lengths for 50, 144, and 220 MHz. Note that the total cable lengths are not specified since I don’t know the parculiarities of your installation. It doesn’t matter how long they are (keep them as short as possible) providing they are multiples of the lengths specified. Again, the velocity factor must be considered.
Selecting Patterns
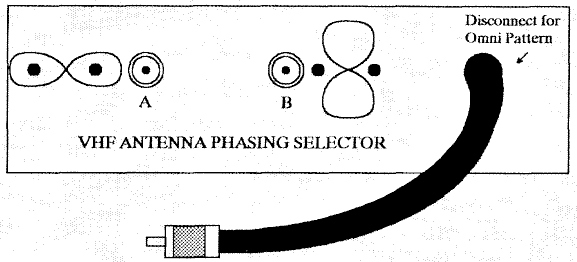
When you have your antennas positioned and the cables run, cut a piece 1/4 wavelength long from one run and connect it as shown. When position “A” is selected, one cable length will then be longer, causing a phase differential and a resulting pattern in line with the two antennas (side to side as mounted on a vehicle). If the plug is moved to connector “B”, a broadside pattern develops to the front and rear of the vehicle.
Simple But Great Results
It is hard to see how an antenna project can be much simpler than this one, and yet produce results that are really worthwhile. In some situations, the gain developed is of less importance than the nulls. In my own case, the output of a repeater in New Jersey is clearly audible while I am driving to and from work. By selecting the proper phasing arrangement, I can null it out completely. However, in situations where the gain and directional nature of this antenna system is not needed, or desired, I can disconnect antenna “B” and operate with a single antenna for an omnidirectional pattern.
Whip or Gain Types
While I have never used this system with anything other than two 1/4 wave whips, the concept should work just as beautifully with a couple of gain antennas. Spacing of the antennas should remain the same.
Pick Your Direction
I am truly gratified by the success I have had with this antenna arrangement. The gain is nice, the null is handy, but the most intriguing thing is the ability to beam signals in different directions while I am mobile. That is really something out of the ordinary!
Originally posted on the AntennaX Online Magazine by John R. Somers, KC3YB
Last Updated : 25th April 2024