Junkbox L-C-L/L-C ATU for £3.00
Having built C-L-C Tees, inductively coupled balanced ATUs, SPCs, and a couple of 10-meter L-C-L Tees, I have intended to build an all-band version of the L-C-L network for quite a while. The addition of a QRP+ to the station gave me the incentive to go ahead. Learning of the potential front-end problems that might result from integrating the rig into the switching system that lets me select among my other rigs, the QRP+ would have to be a separate station on the side, with its own WM-1 wattmeter and its own ATU.
I needed a station unit, not a super compact field unit. It had to have enough heft to support the RG-213 I use to feed the antennas (a GAP-VI and a Butterfly beam). And it had to be soon. That meant finding what I needed in the junkbox, rather than making up a design and exploring hamfests for several years to find the parts.
Here is what I found: 2 10 µH LaPointe rotary inductors from a remotely tuned EDZ beam project, a few HF-100 variable capacitors, a 550- 550 pF 2 section capacitor from my father’s junkbox (probably from a military rig), a ceramic multi-wafer 7-position rotary switch about 7″ long, knobs galore, some 3/4″ aluminum L-stock from a portable antenna no longer in use, and about 2.5 square feet of plexiglass the previous owner of my house left behind. I also found a bicentennial quarter and two long- lost screwdrivers among the junk. That was almost everything I needed for an L-C-L Tee tuner.
The plexiglass would make the panels and chassis, supported and bound by the L-stock. That decision alone would save almost £160 (the cost of 2 new turns-counters). Since plexiglass is transparent, I could count the turns myself. Well-wired ATUs do not radiate, consisting of passive components only, so a metal case is not required. All I needed were 4 insulated shaft couplings, which I obtained from Buckeye Electronics for £3.00.
The Circuit
Figure 1 shows the schematic for my L-C-L Tee tuner. It is straightforward in almost every respect. The 100 pF variable capacitor is always in the circuit, while the 550 pF sections switch in, one at a time, as needed. When using the larger capacitor values, the 100 pF unit becomes a fine-tuning vernier. Hence, I had no need for an expensive reduction drive.
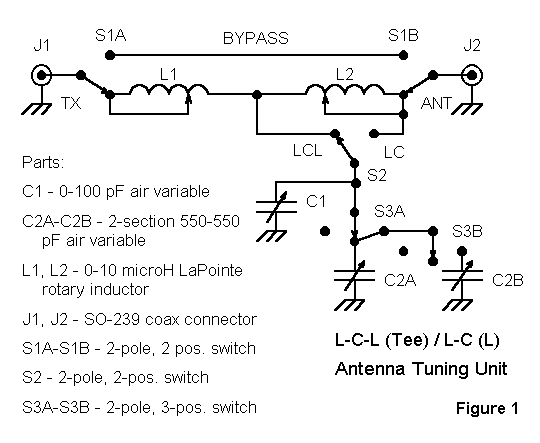
The inductors have spread turns at one end to maintain Q at low inductance values. Therefore, the short from the rotary contact goes to the close-spaced end of the coil.
Although the schematic shows 3 switches, all switching can be combined in a single multi-section rotary switch. Ceramic wafers are best.
The Construction
Plexiglass offers several advantages as a case material for an ATU: it reduces stray couplings to metal; it allows see-through tuning; and it cost me nothing. The “chassis,” top, and front and rear panels are all 5.75 x 11 inch 0.125″ thick plexiglass, with “cut-to-fit” end pieces. A sabre saw and a sander shape the plexiglass well. It handles like wood for cutting and drilling. I use masking tape at cutting and drilling points to minimize scratching.
Two strips of L-stock hold the chassis plate off the table. The coils and capacitors mount on this plate. A set of “ground” connections run under the plate and link all parts, as well as the rails and a small aluminum plate at the rear on which the input and output coax connectors are mounted. Exact techniques depend on the components one finds in a junk box. A handful of 6-32 machine screws, nuts, and lockwashers (with a few 8-32 pieces to mount the coils) is all the hardware the project requires.
Aluminum L-stock pieces around the case perimeter link the sides and bottom of the case, with an independent top piece of plexiglass and a rim of L-stock to hold it in place. Vertical L-stock at the corners is electrically connected to the grounded chassis rails. Only the top perimeter pieces float, but have shown no detectable RF, either to my finger tips or by detuning the circuit from semi-assembled settings. There are no panel markings because none are needed.
Operation
In general, Power lost in network/Power delivered to network = delta/Q In other, equally approximate terms, network efficiency = 1 – delta/Q. (Multiply this figure times 100 for a percentage value of efficiency). Figures for the delta of an L-C-L network range from 1.5 to 2 for loads of 150 ohms, with or without reactances up to ±100 ohms. These figures are similar to those of the more common C-L-C tuner. Both networks will show an increasing delta with increases in the ratio of impedances to be matched. A delta of 2 yields about 98% efficiency, ignoring bad wiring, power switch contacts, lossy connectors, poor capacitor construction, and strays. In short, efficiency is not an issue in deciding whether an L-C-L network should be used as an ATU.
Using an L-C-L (or any other ATU) circuit effectively requires some forethought. Multiple matching settings are possible, and we always want to tune for minimum delta and maximum efficiency at the best match (lowest SWR to the transmitter). The operative rule of thumb is this: Choose the lowest value of L2 (the antenna-side inductor) that permits a match. This setting will ensure the lowest attainable value for delta, whatever its actual value.
Originally posted on the AntennaX Online Magazine by
L. B. Cebik, W4RNL
Last Updated : 28th March 2024